Tuesday, December 28, 2010

Stained Glass Window- California Poppies


We spent Christmas away from home, and I haven't been painting for the last few weeks- but I have made some progress on my latest stained glass window. I haven't been going to the glass studio every week because of the holidays, but I did manage to get my pieces ground and on my board. I love this stage of work, since you can finally see what the window will look like. Next step- foiling the edges and getting ready to solder.
I got the pattern for this window from my mom. She made a window like this many years ago, and my compliments to the artist who made the original window! My mom's window was made with lead, and mine will be soldered with foil, but the look will be the same. I can't wait to finish it and have it in my home- I have always loved seeing it in my mom's kitchen window.

Wednesday, December 15, 2010

In My Studio This Week- Soldering and more soldering


I haven't been able to pick up a paint brush this week- busy with other projects. I miss the painting, of course, but also enjoy the other art projects. Lots of Etsy orders to fill- all soldered glass ornaments and charms, so I have been using the soldering iron instead of the watercolor brushes. Mostly Blue Star Banner charms and ornaments and a lot of ornaments with photos on them. I really enjoy soldering and making these ornaments and charms, but they do take me away from my painting and I was in such a painting groove lately. I think I spread myself too thin, artistically speaking, but I like so many art forms. I want to try it all! Some of the photos I get from people for charms and ornaments are fun to see- old wedding photos, baby pictures, pictures of deployed husbands...Anyway, my studio is a mess of soldering tools, and I will be back at it today while my unfinished watercolors wait a few feet away. Soon!

Wednesday, December 8, 2010

Tis The Season!

Nonnie's tree and a few of her beaded ornaments

My three favorite Santas, waiting to be put somewhere

some of my beach santas


hours of ornaments to unpack and hang

I have not picked up a paintbrush in a few days. I had some Etsy orders to get done and in the mail, and now its Christmas Decorating Season! I should have started right after Thanksgiving, and in my house- that means I am already behind schedule. I like to have Christmas for the whole month of December, then take it all down after New Year's. This year, I have been so into painting, that I just got a late start. I have a pile of unmailed cards still to get done and Christmas decorations in boxes everywhere. I got the tree up yesterday, and put who knows how many strings of lights on it- I really don't know now, I do know that I went to the store for more so I could have enough. I like the old style colored bulbs and also clear minis, but don't forget the all- important bubble lights (4 strings of just those). Today I am putting the ornaments on the tree and around the house on garlands and wreaths. I am a Christmas ornament addict. I have been buying and making new ones every year since I got married (actually before). I just keep getting bigger trees to hold more ornaments. My favorites are the ones I have gotten from people over the years, the ones that put a smile on your face when you see them. I also love the old fashioned glass ones (Christopher Radko, etc). I have also been collecting Clothtique Santas for years and they are mostly the beach santas, but my favorite ones are the New York Santa, Artist Santa and Patriotic Santa. By far, my most treasured Christmas decorations are the ones I have gotten from my grandmother. There are the sequined Christmas ornaments she made (pinning thousands of beads and sequins into styrofoam balls would make me crazy!) and the ceramic light up tree she made. Very old fashioned- and she made them herself, so it means so much to me to have them in my home now.
Anyway, I have a full day ahead of me- time to go to the holiday music in my itunes and get to decorating. That pile of boxes speaks for itself!
Thanks for looking-
Sheryl

Wednesday, December 1, 2010

Stalled Watercolor- "Rooster and Roses"


This is the cookie jar we grew up with, and then it spent more than a few years up in one of my mom's cupboards. I don't know why, but I really love the design. I googled it (of course, how else do you find out anything?) and found out there was a whole dinner set and it was made in the 50's. The cookie jar was a wedding gift, she didn't collect any of the other pieces. I don' know if its the bright colors, or what- but I really wanted to paint it. The watercolor has been fun and so far, trouble-free. My problem now is what to do with it at this point. I know I will need shadows to help ground it, and a table or tablecloth maybe (the reason for the extra space under the cookie jar), but don't want to do that until I am sure what I want to add. I guess I am afraid that I may ruin it when I add other elements and a background. That is my kind of thinking- I have gone this far and I still like the painting, so something bad may be only a brush stroke away! Any ideas? I keep changing my mind on what other things to add- like a table cloth, fruit, cookies, or what? I will paint something else or maybe several other "somethings" while I ponder how to continue with this one.
Thanks for looking!
Sheryl

Sunday, November 28, 2010

Great-grandmother's Monogrammed Haviland China

When we were growing up, this beautiful set of china was in my grandmother's china cabinet in Idaho. To us, it had just always been there. My mother told us about how my great-grandmother had hand painted the monograms, and taken a few pieces at a time to get them fired. My mom doesn't know if she used a stencil or just was very good at painting- it was just one of those things she didn't think much about at the time. She thinks it was painted in the 40's and my grandmother got the set when her mother- in-law died in the 50's. I always assumed (and didn't ask my grandmother) that the gold edge was also done by her. I googled and see that it came that way. This is another one of those things I wish I had asked my grandmother about when I had the chance. I also wonder if it was not that unusual to monogram your china at that time. Maybe her friends did this also. Maybe not a lot going on in post-war Kuna, Idaho at the time.

I have wanted to paint this for a long time, but never got to it. Also, my husband got me an awesome scanner recently and it makes very nice scans. With previous scanners, I always (very often) had trouble getting a nice white background without grey tints. This scanner (Epson Artisan 10000) is worth every penny so far even though I kept telling him I didn't need it. When he's right, he's right.
Thanks for looking!
Sheryl


Monday, November 22, 2010

Watercolor- "Dom Perignon Cork"

An earlier cork watercolor- almost true size
9X12" (this time on smoother surface paper- I think I prefer the rough for corks)

If you have visited my blog before, you probably know that I enjoy using wine corks as painting subjects. I love to paint corks because there is an abundance of detail and each one is unique. I like the different logo designs stamped on them, along with all the nooks and crannies that make them one of a kind. Most of the corks I have are wine corks, but there more than a few champagne corks also. Christmas, New Years, anniversaries- they deserve champagne at our house. With the holidays almost upon us, it made me think a champagne cork would be a good watercolor. I have painted many corks in the past, but they have all been close to their true size. I wanted to try out larger than life corks. I have to say, it was lots of fun- more area to work with meant more fun with the details.
Thanks for looking!
Sheryl

Wednesday, November 17, 2010

Christmas Card Watercolors


I have been working on watercolors for Christmas cards. Some I liked and some got tossed. I started with more "beachy" ideas and just decided I wanted a more "Christmassy" feel. Add to that, the fact that I wanted to paint "2010" written in the sand, and it just wasn't working to my satisfaction. SO- these are the 3 paintings I liked the most. I want to see red and green at Christmas, so the beach just got left behind in favor of shiny lights and jingle bells with ribbon! I am definitely into painting shiny lately- metal and glass. I have been working on reflections- I enjoy painting reflective surfaces, but they do have their unique difficulties. As an artist who loves still life, reflections are a major factor- so why not get comfortable with painting them? Now, to Photoshop and Print Shop and all the not so fun computer work that goes into turning a watercolor into a card.
Thanks for looking-
Sheryl

Saturday, November 13, 2010

Watercolor - "Corkscrew"


I posted my drawing of this watercolor the other day and wanted to show the finished watercolor. I had fun with this one- no problems to fix or paint to lift in frustration. Just a nice, enjoyable painting day- hopefully that doesn't mean today won't go well....I am going to sit down and work on some Christmas card ideas. I used to paint my own cards, and it has been a while. I think, mainly, because I wait until almost Thanksgiving to get to it. I should be painting sandy snowmen in July. Hopefully, I will have a few cards started to show tomorrow.
Thanks for visiting!
Sheryl

Tuesday, November 9, 2010

Thank You To Our Veterans... Past and Present


Veterans Day has always been a meaningful day in our house. Our sons grew up with two veterans in their family- grandfather (USMC Korea) and dad (USMC Vietnam) and both grew up to be veterans themselves (USAF Afghanistan and Iraq) . When they were in school, I was always surprised and sad when I realized that not all of their classmates even knew what a veteran was- it just meant a day off from school.

When I was in junior high, many of us had P.O.W. bracelets to honor the many Prisoners of War during the Vietnam years. I do not remember how long we wore them, but I do remember when we got to see many of them getting off the planes in 1973-finally home. For the time I wore the bracelet, I only knew the name of this hero. When the former prisoners returned home, I had a face to match to the name. LCDR Edward Davis was a navy pilot who flew 57 missions before being captured and held for 7 1/2 years. A hero.

I came across my bracelet recently and wanted to do a watercolor and with Veterans Day, this was the perfect time. I would like to thank Capt. Edward Davis USN (1939-2006). I would also like to thank my father-in-law, husband, and two sons for their service. Thank you to all our veterans past and present!

As we express our gratitude, we must never forget that the highest appreciation is not to utter words, but to live by them. ~John Fitzgerald Kennedy

Monday, November 8, 2010

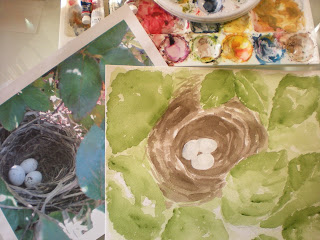
Watercolor- "Hidden Nest"


I was really in a watercolor mood this weekend -finished a few paintings, and started a few more. I guess that's what happens when I can stop being so consumed by baseball. My favorites, NY Yankees and SF Giants BOTH made it to the playoffs and that means a lot of games to watch. I have been a baseball fan for years, even sat through an earthquake at Candlestick Park during the 1989 World Series. Now that the World Series is over (WOO HOO-Giants!) I have more of my painting time back and my priorities are back in order.

I finished the bird nest painting. When I took the photo, I couldn't wait to paint it. I always have more painting ideas than time to paint them all! I enjoyed this watercolor, and liked it more and more as I got the layers of color on and the darker areas defined. I am not sure it has the depth I wanted, to really make the nest look like it is down into the rose bush. Who knows? I may go back to it after looking at it some more and seeing exactly what I need to add. I am kind of stumped as to what to call this watercolor. Any ideas out there? I never really named my paintings before- but since I started listing them on Etsy and learning about tags, I have started to see the importance of painting titles and descriptions. With gazillions of watercolors online, we need some way to get people to look!

I also started a few more wine cork paintings. I have more than a couple wine corks in jars at home, so my supply of corks to paint is kind of unlimited. I find them very interesting due to the detail and uniqueness of each one. Lots of nooks and crannies, grain lines and wine stains for a detail loving artist like myself to get into. Some of the labels on them are quite creative also. I have painted them small and larger, and using many different mediums. With oils on masonite, I can get the finest detail- but I also love the texture of the watercolor paper. This time, I wanted to do some corks larger than actual size. I drew these on 11X15 cold pressed, rough surface watercolor paper.
Thanks for looking!
Sheryl

Wednesday, November 3, 2010

Pretty New Palette... and a new watercolor


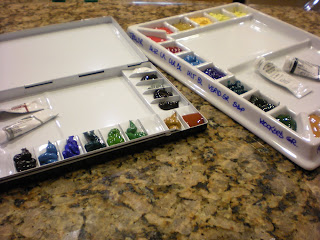
Got something great in the mail yesterday -whenever I get mail from Cheap Joe's it is great! Woo Hoo - fun, new art supplies! I decided it was definitely time for a new palette since I have made such a mess of my other painting and mixing trays. I ordered a smaller palette with a lid that I can take places, and a big porcelain one for my painting table. The porcelain palette is heavy so it won't move around while I am mixing colors, and I took pictures so I can remember what a nice, organized palette looks like. I even set the paint tubes around it and rearranged them until the colors were in the order I wanted. I usually just squirt paint onto the tray wherever there is an empty (or kind of empty) space. I was afraid to make a mess of my shiny white palette. I also took a tip from Cheap Joe, and labeled my colors.

I also have a start on a watercolor I have been wanting to paint for quite a while. In the Spring, two of the rose bushes in my garden were homes to bird nests. Birds were constantly flying in and out of the roses. I managed to get some photos during one of the moments the birds were away. I have been thinking about painting this for months and now that I am getting to it, I hope I will not be disappointed with the finished product.
Thanks for looking-
Sheryl

Monday, November 1, 2010

Finishing Watercolors


I have been enjoying my "new" studio space this last week and getting lots of painting done. With my painting table in the middle of the room instead of at the window, I actually have more room to put larger watercolor paper on it. Now I don't have a wall in front of me and the paper can go off the edge of the table if I want to turn it side ways or push it away. I haven't been keeping up with posting, so here is some of what I have been working on. I am thinking about adding some gulls in the beach painting for some interest. Sometimes I paint from 2 or 3 photos to get the painting I like, but this photo was pretty much what I wanted. I left out the washed up piles of sea weed since I don't consider them of any interest, and made a few minor changes.

The vineyard, as I have mentioned, was such a problem to me and I just wanted to be done. I did add a farm worker down the row for something else to look at. I tried to keep him vague, and duller color since he is far away- yet still have him there. I went with purple toned shadows which I often like, and added alizarin crimson and french ultra blue to my green vines to put them in shadow with the same cool purple tones as the cast shadows.

The sand pail was pure fun, and I always enjoy painting them, and the beach. I haven't painted a sand pail in a long while and they are among my favorite painting subjects -with the bright colors and details. This is an antique pail I found at an "antique" shop on Long Island and I use the word antique loosely here. Very much a junk store- my favorite kind. You never know what you will come across.
The sand pail is on 18X24 watercolor paper (as is the vineyard watercolor) and looks slightly out of perspective due to the angle I photographed from- will look better once it is scanned- this is just a peek. I will have to scan all of these larger ones in about 4 pieces and then stitch them together to print them.

I am working on the 100 Paintings Challenge (in a year) and need to keep up with at least 2 each week, or have some of those crazy weeks of one or more paintings a day to catch up!
Thanks for looking-
Sheryl

Tuesday, October 26, 2010

Studio Makeover


My art studio has been set up since we moved into our new house over two years ago. Sometimes, I choose to paint downstairs because it is like an oven in my west-facing studio in the afternoons about half of the year. I do not want to double my power bill just to be cool upstairs in the late afternoon. The other reason my studio has not gotten much use (except as an art supply room) is that I wasn't happy painting in there, but wasn't sure what to change.

Saturday morning, we were watching a movie on TV and my husband mentioned that the woman in the movie was crazy to have her desk situated so her back was to the door. Creepy. I mentioned that my studio was set up that way (to have a view of the park out the window). My easel faces the door (just by chance), so it is okay! That got us discussing the ways we could improve my painting space. Within an hour, we were off to Costco. We bought more of the great metal bakery type shelves on wheels- like I had in New York. When we moved to California, the movers loaded them on the truck put together instead of taken apart and they weigh too much to be dragged upstairs to my studio. I settled for bookcases which were easier to move. Sometimes it just isn't good to settle. Now, two years later, we did what we should have done in the first place. We also moved my desk/work table into the middle of the room.

It just seemed right to put it in front of the window before without really thinking. Now, my desk is in the middle of the studio and all of my art supplies and all the fun things (like sand pails and painting ideas) are around me instead of behind me. I can see all of my supplies - paints (oils, watercolors, acrylics, and glass paints) all in separate baskets with labels. My soldering stuff is also organized and easy to find. I put all of my gazillions of art books and magazines into baskets so they are contained, at least. My scrapbooking stuff, well, at least it is in baskets even if it doesn't look exactly neat and tidy.

Everything is perfect now. I guess some artists have studios with everything out of sight into cabinets, but I really like seeing all of my art "stuff". It keeps me motivated. I have two cork boards to tack up ideas, and a huge chalk board to scribble on also. I guess I fall into the messy artist category, but I love it! Now, back to painting.
Thanks for looking,
Sheryl

Wednesday, October 20, 2010

New in My Studio- Watercolor "3 Amigos"


I am starting a few new paintings to give myself a break from the frustrating raisin harvest watercolor. I shouldn't have gotten into it, as I almost never enjoy painting something I painted before (no matter how many years have passed). I was thinking it would be fun to do it again with a different style and maybe learn some new things. I have managed to learn how aggravated I can get with something that started out as fun. I love the vineyards, and after so many years in Fresno, they are a part of my life...I will get back to it soon- I have already started a second one to replace the first one- one way or another, it will be finished. I got a lot of great feedback and help from my fellow artists on my post yesterday, so I know it will be easier when I do go back to it. Thank you all for your comments!

One of the paintings I started yesterday is from a photo a friend took at a Long Island beach about 10 years ago and gave to me after she painted it herself. I call it 3 amigos- just looks like a perfect beach day. I have already painted it twice with different palettes (both many years ago) and like both of them. I know what I said earlier about repeating a painting...but I have had good luck with this one and wanted to try some new techniques on a subject I love-the beach. This time, 3 amigos will be 15X20 instead of 8X10.
The other painting I am working on is an 18X24 version of one of my sand pails. I have painted many sand pails and enjoy them every time! I buy the antique pails whenever I see them and use them for holding art supplies and paint brushes on my painting table. I love to look at them, and this way they are also functional so I can justify buying them. I just have one problem- when did something made in my lifetime get to qualify as an antique? Yikes, that is definitely a bummer!
Thanks for looking,
Sheryl

Tuesday, October 19, 2010

Vineyard Watercolor.....can this painting be saved?


Yikes! I have done it again- managed to take a watercolor that had a nice start and turn it into a painting that I should probably give up on. That is my main problem- I HATE to give up and instead I set them aside and return to my frustration another day. I did a watercolor similar to this one for my in-laws (of their vineyard at raisin harvest time) and liked it. I think I used purples for my darker shadow areas now that I think of it. Also, I think I didn't try to make the piles of raisins look like anything specific- which was probably a good idea. So, anyway, I have lifted some of my shadows and am trying to figure out my next move. I have spent the last few weeks trying to ignore the large half finished watercolor on my painting table! Any ideas from my fellow artists? Do I need to learn to just give up and start over, or can this watercolor be saved? I don't know why I have such a problem bailing on a painting...I guess I must somewhere deep inside my brain, love a challenge. It doesn't feel that way when I am struggling with it, I could have finished 5 of these in the time I have pondered my next move.
Thanks in advance for any advice!
Sheryl

Friday, October 15, 2010

"In The Garden" Oil on Canvas- Finally Finished


Well, I finally finished the oil painting of my tree roses that I started many weeks ago. I am a slow painter, but not that slow. I only work on it when I go to my oil painting class once a week. I have been with the same painting group for many years- since college. I had to give it up for the years I lived in New York, but now that I am a mere 2 hour commute away- I get to go! Same instructor, and same group mostly. The group is mainly women in their 60's to 80's- we have all aged in the almost 30 years since I joined. I am not in my 60's- barely into my 50's- and once a week I get to feel like the kid and that is awesome. Yesterday, I went to class and finished up some details like the water drops and the light splashes in the leafy area. Then, I got to hear the words we wait for Gary to say- "time to sign it". Woo Hoo!

The painting is painted from a photo of one of my tree roses in my nicely maturing (third year, best so far) rose area of my gardens. I have another photo of the same rose bush that has a bird nest tucked into the branches and I really think I need to paint that also.
Thanks for looking!
Sheryl

Monday, October 11, 2010

100 Paintings Challenge- #1 " Evening in Paris"


I just started the 100 Paintings Challenge, and am so excited to be a part of it! I paint most days anyway, but I think with a number as a specific goal, I will really keep at it. Only 99 more paintings to go! The way I understand the challenge, it isn't about masterpieces. It is about working on your skills and, for me, making painting even more of a priority. I think if I paint even more than I already do, I will definitely improve- practice makes perfect, right? I am already doing The Twenty Minute Challenge, and love how it makes me work on prioritizing the details in my paintings since the clock is ticking away. I have a tendency to keep working and reworking my paintings until SOMETIMES I go too far and no longer like the painting. Even I can't overwork a painting in 20 minutes!

I chose this Paris street scene as the first of my 100 for many reasons. My main reason is that I love this street- Rue St. Dominique in the 7th Arrondissement of Paris. We stayed in a hotel on this street and the location was perfect. Rue Cler, the beautiful Seine and Pont Alexandre, La Tour Eiffel - all VERY nearby. Most of my photos of the street were daytime and I really wanted to try a night scene. My night photos were all very dark except for the bright lights. I used one of the day photos (actually, as I often do, I used several photos) and tried to turn it into a night scene. That is one of my other reasons for choosing this painting- it is my FIRST attempt at a night painting. What better way for me to learn, than to try something very different for me? I am sure that if I keep working on night scenes and the different use of color, lighting, sky, etc,- I will improve. I do have a photo of a beautiful night view of San Francisco from Treasure Island. Maybe next time....
Thanks for looking!
Sheryl

Wednesday, October 6, 2010

First Thursday ArtSplash on Etsy

Tomorrow, October 7, it is time again for First Thursday ArtSplash on Etsy! The first Thursday of each month is ArtSplash- a perfect time to go over and check out the wonderful variety of fine art available in shops on Etsy. There are many artists involved and it showcases original fine art. You will find oil, watercolor and acrylic paintings as well as drawings, pen and ink, and mixed media- just about anything that can be classified as fine art. Just go to http://artsplashonetsy.blogspot.com or click on the ArtSplash button in the side bar, and take a look.


My vineyard watercolor was put on pause yesterday due to an unexpected soldering problem. I recently changed to a new bottle of flux in soldering my silver art charms. There are many variables to look at when trying to figure out exactly what is causing my problem. The solder? Doubtful. The flux? Also doubtful. The foil? No. The flux brush? Maybe- it is a new and different brush. The method of cleaning flux residue off my charms? Very possible- I used to just wipe them with a damp cloth (for many years) and, lately I have been using the same (ammonia free) glass cleaner I use to clean my solder lines on my stained glass windows. The flux is a different brand, and the glass cleaner is also different. For whatever reason, a few of my charms have had flux making a return appearance even after cleaning and much polishing. I am guessing that something about this new flux makes it harder to remove and it isn't completely gone even when I think it is. I will now start using the flux remover that for years I didn't see a need for- and until recently had no real need for. I have charms and ornaments that I soldered 10 years ago and never had a problem with. Now, I will have to use the process of elimination to find out why I am suddenly having a flux issue. Fortunately, super-fine steel wool takes care of the problem. So, no watercolors today- just soldering and looking for answers.
Can't wait to get back to my vineyard painting!
Thanks for looking,
Sheryl


Monday, October 4, 2010

Raisin Harvest Watercolor- Stage One

For me, as an artist, there are two times when the vineyards look spectacular. The first is in the Spring, when the leaves first start to pop on the vines- they actually seem to glow when the morning sun shines on them. They start out a beautiful bright shade of green. My other favorite time in the vineyard, is when the grapes are being harvested and set out on the grape trays to turn into raisins. Harvest time is a pretty time because it is late summer and the vines are starting to turn colors and there are hints of fall shades mixed in with the green. The grapes are green when they are put on the trays and start to change color as they dry. The raisin trays used to be made out of wood and were much more interesting from an artist's point of view, but somehow have gone away- apparently the farmers prefer the paper trays. I will be looking for old photos with wooden grape trays, but for now this is what I have!

My in-laws used to own a vineyard, and I have many photos for painting. I have done many vineyard paintings in watercolor, oils, and acrylics. Watercolors just seem to be the best medium for this subject. Recently, I noticed that I have very few of these paintings in my own home. Most have gone to live elsewhere as gifts. I have PILES of photos that I shuffle through whenever I am looking for inspiration for my next painting- this time, the vineyard kept catching my attention.

I took a photo of my pencil sketch, but it wasn't drawn darkly enough even with the help of photoshop, so I am not bothering to post that step. I am starting with my photo showing my initial washes. I always love this step of a watercolor, when things start to take shape.

The dirt was wet-on-wet washes using Burnt Umber and Burnt Sienna mixes. The leaves were various mixes of Sap Green and Chromium Oxide Green. I will add other colors later, since it is late summer and some of the leaves have started to turn color. The raisins are a light wash of Alizarine Crimson and Ultramarine Blue just to give them a base.

The most difficult step is going to be deciding how to tackle the shadows. In oils, it is easier since I would be working over dry paint (leaves and dirt areas), but in watercolor things can easily get messy and muddy. I am leaning toward using a purple tone for the shadows, we will see how that goes. Any ideas? Off to paint...
Thanks for looking!
Sheryl

Thursday, September 30, 2010

"Wicker Bounty" Watercolor - Step 3 (Finished)

LOVE the texture of rough watercolor paper


I am trying to keep some of my paintings looser and softer looking. I decided not to totally detail the wicker and each separate leaf. I am not sure if it is the right choice and I really, really want to get back in there and DETAIL. It was very difficult for me to stop and leave it looking more relaxed. Same goes for the softer background. I chose rough surface watercolor paper to give it texture and am working on 18X24" this time. I am a detail loving artist and my favorite paintings are my super detailed oil still lifes on masonite (each and every little speck and line shows). It is hard to break old routines, but that is why I love watercolor- the loose quality that is possible.
I couldn't help myself from putting in the darker areas since they really seemed necessary to help suggest the light areas without going into too much detail and over-painting. Most of the darker shadow areas are just more layers of Payne's Gray. I used some Burnt Umber and Cad Red mixes in the dirt and in the leafy areas. The leaves are mixes of Sap Green, Olive Green, and Burnt Umber. I also used Raw Sienna on the leaves so it wasn't just shades of green. The cushion is Burnt Sienna, Sap Green, and a wash of Burnt Umber. Some of the mum petals are put back in with white gouache to give them a stronger look.
Thanks for looking!
Sheryl

Wednesday, September 29, 2010

"Wicker Bounty" Step 2


I started this watercolor by putting in a wash of Cobalt and Ultramarine Blue, working wet-on-wet. I am painting on 140 lb rough surface paper. I love the rough surface because I want that watercolor paper texture. Starting with some background color helped to define the white wicker. As usual, I couldn't wait to get to the details, so I jumped around a bit to get some colors on the paper.
I am using Payne's Gray to give the wicker some shape, but really want to not paint every separate piece of wicker. I want to show that it is wicker without getting too into detail like I usually do. I started with Sap Green and Chromium Oxide Green for the leafy greens. The reds are mixes of Cad Red and Thalo Red and the pots are Cad Red and Burnt Sienna.
My watercolor supply is a mixture of Windsor&Newton and Grumbacher, depending on the colors I want at the time and availability. I often order online and like to try out different brands of the same color. Basically, I use whichever color is working for me at the time and try not to get too stuck on a brand name unless there is a major difference.
Next, I will be continuing with my details and getting to the darks.
Thanks for looking!
Sheryl

Monday, September 27, 2010

A Trip to The Nursery for Fall Flowers - and a new watercolor


My garden and pots are in need of some perking up. That always seems to happen at this time of year. The petunias are tired and leggy, and many of the summer perennials are just about ready to quit for the year. I could just let it go, but I am never ready for the garden to slow down and I fight it all the way. I make numerous trips to the nursery during the summer to buy fresh plants to energize my pots. With the hot, dry summers we have and all the hot wind that comes along with them- I am constantly needing to replace dry looking flowers. I am always trying to extend my growing season as long as possible- I am forever thankful for the rose garden, they work hard practically year round.
When I was unloading my latest haul onto the porch and setting the plants wherever there was room, I loved the combination of the flowers with the wicker chair. I couldn't wait to start drawing...of course I do need to plant all the pansies, mums and cyclamens I bought (after I get a good drawing). Gardening and painting are two interests that really go together well and my garden gives me an endless supply of painting ideas. This is the drawing and I plan to try to keep it from getting too detailed as I paint. I hope so anyway.
Thanks for looking!
Sheryl

Saturday, September 25, 2010

Jinx Watercolor

JINX

I think I am done with this watercolor, and actually probably should have stopped sooner. Over-painting is my own personal curse. I plan to keep painting her until I am completely satisfied that it shows her unique personality. I think her nose needs to look longer and then her head will look less round. I used burnt umber in the areas of her nose and "beard "that have slightly lighter fur, and I am thinking maybe if I left it a little lighter on top of the whole nose (not just the tip) maybe that would have given it more depth. Like I mentioned when I started, this is really my first attempt and I definitely will keep at it until I feel comfortable. A fellow artist suggested using french ultramarine blue and burnt sienna for the black (thanks, Pat!) but I had already used the payne's gray in layers for my lights and darks then added the burnt umber later. I will definitely try that mix next time (SOON) and don't actually know why I didn't this time! I always use a mix of ultra blue, b.umber, and alizarin crimson as my standard dark- varying the blue and crimson, depending if I want it warm or cool. Also, Pat suggested leaving some more white when starting to lay in color. I am thinking (in hindsight of course) that even though she is all black, more light would help with giving her head shape under all that thick black fur. I didn't detail the fur except for a few ares where I added some lines. We learn so much from all of our attempts at painting! One of the next challenges on my list is people. I have painted my kids before and while I am happy with the results, I would love for it to be easier for me. That's where practice and perseverance come in.
Thanks for looking!
Sheryl


Friday, September 24, 2010

New in My Studio- Watercolor of my puppy, Jinx


I love to paint and enjoy painting a large variety of subjects. One area I try to avoid is painting animals and people...nothing with a face, basically. I don't know why, but I just never gained any confidence in that area. I have decided it is time to do something about this irrational fear. I am starting with my cute puppy, Jinx- I might as well start with something I like, right? The main problem with painting people and animals, isn't making them look like a person or an animal- it is trying to capture their unique personality. I know I can paint a dog, but will it look like MY dog? My other concern is the black fur and trying to give it texture without painting every curl and wave on her head. In the photo, her left eye isn't really visible so I am changing that- even though we rarely see her eyes unless we are outside and the sun is on her face! This is my progress so far today, after about an hour (including the drawing). I am starting with getting some of the shading in so I can see a shape. I will post the finished watercolor tomorrow and welcome any helpful tips.
Thanks for looking!
Sheryl

Wednesday, September 22, 2010

Zin Bottle Watercolor Step-by- Step (well, sort of)


I started this wine bottle watercolor when I started the cork series. I just loved this bottle. With a name like Artist Series, and an easel on the label- I had to paint it! It is from one of our favorite Lodi wineries, M2 Wines. We belong to the Lodi Wine Club and they have a huge selection of wineries included. It is a great way to try out wines from many wineries in one place. M2 happens to be one of our favorites, but we have lots of favorites! So, the wine from the bottle was awesome, and now I got to have more fun with it by doing this watercolor. I already have my next wine bottle watercolor chosen- a bottle of Fisticuffs Cabernet from Tu Tu Wines in Napa Valley. When you see the label, you will understand why I have to paint it - I already painted the cork in my wine cork series. When I get the bottles painted, I can finally throw them away- my husband would like the empties gone already (he doesn't appreciate them as future works of art).

I took some basic color notes as I started painting, because I am not usually thinking about the details as I paint along. I started with all of the base colors
- Sap Green for the bottle, leaving light areas (I don't usually use masking fluid except on tiny white areas)
-Raw Sienna for the cork
-Thalo Red bottle top and wine stain on cork end
-Raw Sienna and Thalo Red for the skin tones and Cad Yellow pants
-Easel, Burnt Umber, and artist background- Turquoise
-corkscrew and bottle shadow Payne's Gray
I based most of the color wet-on-dry, but the shadow area was wet-on-wet as was the raw sienna background I added later to make the bottle stand out. The last steps are the details (lettering), darkest darks and highlights.
Most of the lettering on the bottle label and the cork are done in Burnt Umber, but the M2 is heavy on the Payne's Gray as is the 2007 on the end of the cork. I went back in with white gouache for the brightest pops of highlights. Cheating? Maybe, I don't really care if it gets me the result I am looking for!
I kind of got into my painting and forgot to slow down and take step by step photos- as usual. At least I took notes- I am getting better at this process! My main focus was on NOT trying to put in every little detail and to loosen up a bit. I love loose, flowing watercolors- unfortunately, I seem to lean towards tight and detailed. I need to remember sometimes that I am not creating a photo, but a watercolor. That is where the Twenty Minute Challenge will hopefully help me in the future.
Thanks for looking!
Sheryl